Emergency Preparedness – Water Storage
We have seen how many of those residents in the path of Superstorm Sandy were not prepared for a long-term power outage and didn’t have access to clean water for drinking or hygiene purposes. We can learn from this disaster and become more self-reliant by taking steps to minimize the effects of a water shortage or complete outage. The key is to plan ahead and have water stored in advance of when it is needed. Here are several methods of water storage that can be called upon for use in disaster planning, whether we are aware of an imminent threat or not. Many Americans rely on water wells that require electricity and even those who get their water from a municipality are dependent upon the electricity for pumps at the water facility or pipe integrity. It is recommended that one gallon of water is stored for each person, per day, for about 8-14 days worth of storage. For hygiene purposes and possible toilet flushes, you may wish to store more. Personally, I don’t think it is possible to store too much water as long as it is stored properly.
You can store water at little cost by saving and reusing 2-liter plastic soda and large water bottles. Just make sure they’re very clean. Do NOT reuse milk containers as their porous surface is difficult to clean and they tend to leak over time. FEMA recommends adding one drop of non-scented chlorine bleach to each liter of stored water that is not from an already chlorinated source to prevent any bacterial growth in stored water.
If we know a hurricane or a severe storm is coming and there is a liklihood of power outage we can use something like a waterBOB. A waterBOB is an emergency drinking water storage device that lays in a bathtub and acts as a bladder that is filled with tap water prior to the emergency. A waterBOB will hold up to 100 gallons of fresh drinking water for up to 4 weeks. It comes with a syphon pump to transfer needed water to another container for use. It would be best to store one of these waterBOBs for each bathtub in your home. One disadvantage of the waterBOB is that you must fill the container before the tap turns off. This may not be possible for those on well water without knowledge of an impending power outage. Also, waterBOBs are intended as single use storage devices which means replacing the unit once it has been used. This means if you fill it up with water ahead of a big storm and then you do not lose power and water, then you have used the waterBOB and will have to replace it before using one for the next potential outage. But, if you don’t use it and then need it, that would be a very disappointing situation indeed. WaterBOBs cost approximately $23.99 and Amazon offers free shipping on orders over $25.
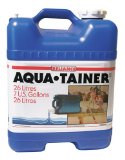
A long-term water storage option is the Aqua-Tainer which is a thick-walled rigid plastic container that holds seven gallons of water. This could be filled just prior to a need, but it would be much more wise to fill several of these and keep them stored until needed. These containers have a cube shape and stack fairly well. They are BPA-free and are good for long-term storage. The Aqua-Tainers run about $17.99.
Another option for storing water long-term is the Moeller Scepter Water Can, which looks similar to a “gas can” but is light blue and is designed for long-term storage of water. It has a 5 gallon capacity, has a vent and long spout for controlled pouring, and runs about $19.99.
A fairly permanent option is a rain barrel or storage tank. The Fiskars 58-gallon rain harvesting system allows you to tie into a guttering system to collect rainwater. Rainwater may need to be filtered or boiled for safety, depending on where it is collected. One of these large-capacity collection systems costs about $144.99 and has free shipping from Amazon.
 Regardless of the method of water storage that you choose, please consider initiating or adding onto your water storage plan as soon as possible. Having clean drinking water stored when a crisis emerges gives real peace of mind for the safety of you and your loved ones. If you have the ability and space, you may wish to save extra water for the benefit of your neighbors and friends who may not be as prepared for emergencies.
How to Can Bacon at Home!
I LOVE BACON! And I love canning. So naturally, it is fun to combine the two. It’s EASY, CHEAP, and FUN to can bacon at home. You MUST use a pressure canner to can bacon. You CANNOT water bath can bacon.
Here are very detailed instructions on canning bacon… I hope you enjoy!
Oh no! Bacon was on sale and you couldn’t resist stocking up. But you don’t have freezer space or don’t want to risk losing all this delicious bacon from a power outage or maybe you just want to save the room. Let’s can it!
It is necessary to can bacon in quart jars for the most convenience. You MUST use WIDE mouth jars to get the bacon to fit. One quart jar will hold approximately one pound of bacon as a roll. The first step is to get your parchment paper.
 Tear it off and allow it to roll up again. Using scissors, cut off the bottom 1/3 of the sheet. This will be about 5 inches or so.
 Lay the bigger piece of the parchment paper flat on the countertop.
Lay the bacon side by side flat on the parchment paper. With luck, your paper will be the right size for the bacon to fit with a little room to spare. You should be able to get approximately one pound of bacon on the sheet. For me, this is between 12 and 14 slices. You’ll get the hang of how much bacon to use really quick once you try to get it into the jars. I like to stagger my strips, alternating top and bottom of each slice to help them fit on the paper more uniformly.
Now place the smaller, remaining piece of the parchment paper over the lower half of the bacon strips. Slide your hand across the paper to make it adhere to the bacon really well.
 Now gently fold the top half of the big piece of paper over the smaller piece on bottom. It may take a couple of attempts to get good at this motion. This folds the bacon in half in a very neat way. Then run your hand down the strip to make it flat and even.
 Now it is time to start rolling up the entire “sandwich” of paper into a as tight of roll as you can, keepin the roll straight.
 Now you have a very compact roll of bacon wrapped in parchment paper with a piece of parchmen paper between the folded slices. It is now time to slide the roll of bacon into the wide mouth quart jar. I prefer to leave the open end on top. Sometimes it helps to twist the roll to get it to slide into the jar. I also prefer a tight fit, this is where you really learn about how much bacon you want in each roll for the next jar.
 Now make sure to use a clean cloth or paper towel to really wipe the rim of the jar. Often, grease from the bacon will get on the rim when you’re sliding it in and this oil will prevent a good seal from forming during the canning process. Use clean jars, but I do not sterilize my jars when I will be pressure canning for a long period of time. You can use sterilized jars that you have boiled for 10 minutes if it makes you feel more safe.
Now place the lids and rings on the jars and tighten to just finger-tight. You do not want the lids on too tight.
 Once you have all of your bacon jars prepared, it is time for them to go into a pressure canner that already has about 3 inches of water in the bottom. I use the Presto pressure canner from WalMart and it holds 7 quarts at a time. I start my water heating as I am filling up the canner to save on time. Once all your jars are in the canner, the water level will have risen higher in the canner, this is normal. You do not need the water level to cover the jars for pressure canning.
 Put the lid on the canner and allow the canner to heat up and some steam to begin to vent from the vent outlet for a few minutes. Then carefully place the weight on top (10 pound weight unless you’re high altitude, then 15 pounds) of the vent.
 After the canner has heated and adequate pressure has built up, the top weight will begin to wobble and make a distinct sound. When this is consistent and not an intermittent sound, set a timer for 90 minutes. After 90 minutes has elapsed, turn off the heat. WAIT until the pressure drops to zero before opening the canner. This will be known by the pressure tab that had popped up during heating falling once again or by the pressure gauge falling to zero if your canenr is equipped with a gauge. THIS IS IMPORTANT. DO NOT open your canner until you’re sure the pressure is at zero, even if this means you must leave it overnight. Usually this just takes less than an hour or so. Once you’re sure the pressure is down, open the canner and carefully remove the jars with a jar lifter. They will be very hot. Place them on a towel on a clean countertop, with space between each jar allowing them to cool. Once cool, verify that the jars have sealed by observing if the top is indented and it does not pop when you push on the center of the lid. Remove the rings for storage, as they will likely rust causing problems with the seal remaining intact for long periods of time.
You may be wondering what a finished jar of bacon looks like. You may be even more curious what the bacon looks like after an extended period of time and has been opened and cooked. Well here it is! I canned this particular bacon in October of 2011 and I am creating this post in July of 2012. Nine months have passed since this bacon was canned. You can see the liquid fat in the jar near the bottom with a white layer of bacon grease above the liquid, about a quarter of the way up.
 Open the canned bacon with a can opener like this…
 Reach into the jar and grab the parchment paper and pull it out.
 Place the roll of bacon in a pan.
 Unroll the parchment paper and gently wipe off the bacon into the pan. This is a little messy.
 Now there is a pan full of previously canned bacon. This is what it looks like.
 Often, the bacon coming out of the jar is very tender and will fall apart. This is normal, just don’t expect to end up with pretty strips after it’s cooked. I usually just cook it like this and not worry about cooking it in flat strips. My husband cooked this batch of bacon a little longer than I would have. It was crunchy, but he likes that.
 And now we have learned how to can bacon from the raw state to being preserved and then cooked to a complete state after having sat on a shelf for 9 months! Doesn’t it look yummy?!
 Please let me know how this works for you and leave a comment. Share with your friends!
How to Grow Ginger at Home
I have read a lot about the medicinal properties of ginger and wanted to see if I could grow it at home. It is super easy! Here’s how I am doing it, and it seems to be working well.
Pick up a piece of ginger at a local store, preferably organic if you can find it. Try to pick a piece that has more than one nodule or section that you can break apart. When you’re ready to plant these roots, break apart the separate nodules. Using a pot(s) of good soil, place the ginger pieces on top of the soil and “wiggle” them down into the soil but leave some exposed above the surface. Keep it watered as you would other plants. I water most everything once a day.
It took several weeks, but the ginger root pieces have sprouted and are sending up straight pointy stems, creating new plants. It was very easy to get these started and I am looking forward to growing more ginger. If anyone has any further experience doing this, please leave a comment! I’m curious how long it takes and harvesting information. Thanks for reading!
How to Kill Aphids Naturally, without harmful chemicals
As you can see, Aphids are devouring this tip off one of my potato plants. I noticed that Aphids were tearing up my potato plants and were really going after some of my other crop vegtables like spinach, peppers, and even some of my tomatoes. A long time ago, I read that one could mix up a stray bottle with a little soap and spray the plants once or twice a day and the aphid problem would lessen. This would allow a natural way of pest elimination when you don’t want to use pesticides on the food you wish to feed to your family. Here is what I did….
Just mix 1/2 teaspoon of liquid soap (I buy Dr. Bronner’s Castile Soap, any scent will do) into a clean spray bottle and shake well to mix. Then spray this lightly soapy mixture all over your trouble areas. Don’t do this during the sunniest part of the day or you might fry your leaves from the sun magnifying on the water droplets upon the leaves. This should be done twice a day, if possible, until you don’t see any more aphids. I prefer to do this after watering, so that the watering doesn’t wash off all of the soap.

As you can see, very inexpensive treatment has caused many of the aphids to dehydrate and shrivel into little white specks like mummified corpses that do not move. I’ve read that the soap eats through their little skins and causes them to dehydrate and die.
You may have to do this several times, as you can’t get all of the aphids in a single spraying. But doing it this way makes me feel a lot better about the food I am feeding my family and will increse my yields since I won’t have as much plant damage.
Just another note, LadyBugs eat aphids. A lot of aphids! You can buy Ladybugs online and release them into your garden or greenhouse. I believe I saw 2,500 ladybugs for about $20 online. It sure beats losing a whole crop to an aphid infestation.
Does anyone else have any tips and tricks for safely eliminating pests in a garden or greenhouse? Please leave a comment!
Lunch Experiment with Rocket Stove
In general, I want to post things that are informative and to the point. Today is a little different. My daughter wanted a grilled cheese and hot dogs for lunch. I thought, “Hey, the rocket stove can do this,” so I gathered what we needed (ignore the grill I placed the items on for the picture).

Our first attempt on the rocket stove left the pan covered in black ash. Just one of those things we didn’t think about ahead of time.

This time, I wrapped a cookie sheet in a layer of aluminum foil as a test.
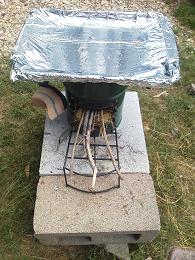
Not knowing how well the heat would disperse on the cookie sheet, I placed everything as close to the middle as possible.

The food was very tasty—rather difficult to ruin hot dogs.

But there are some lessons to be learned here (that most of you probably already knew):
- 1 layer of aluminum foil on cookie sheet—not enough. Maybe we should just use the cookie sheet as a diffuser and cook on a pan on top of the cookie sheet? My wife just suggested that we wrap the bottom of a pan in aluminum foil as a protective barrier from soot.
- Metal spatula for flipping on aluminum foil—asking for trouble. Coat the aluminum foil with cooking spray? Silicon/plastic spatula?
- Grilled cheese can burn in a blink of an eye. (I took a picture of the first grilled cheese, which was cooked to perfection. I gave that one to my daughter. My wife and I ate the crispier ones.) I’m an expert at burning the first side in the house, too, because I tend to forget about it.
In conclusion, yes, this takes a little more time and preparation than cooking it on the stove. But, we used renewable fuel (we have lots of trees around) and we didn’t heat up the house on a warm spring day. My daughter was happy with her lunch, so I would call it a success.
If anyone have any recommendations or experiences they would like to share for a newbie cooking lunch on a rocket stove, please post a comment. I greatly appreciate it.
How to Manually Pollinate Vegetable Plants
My vegetables are growing in a greenhouse that we build into our home. This means I don’t have the benefit of insects pollinating my blossoming flowers and must do the job myself. It is not difficult at all if you know what you’re looking at, so I am going to break down the process step by step and teach you how to manually pollinate your vegetable plants.
First, it is necessary to distinguish between male and female flowers. This is very easy to see if you just learn it once and this method applies to many plants especially squash and other melons and gourds.
Let’s take a look at a female flower first, as it has something the male flower doesn’t, an ovary.
In the photo above, the top flower that is sticking straight up in the 12 o’clock position is the one we’re looking at. It has yellow petals and a light green bulbous structure underneath the petals. That is the ovary and it will eventually become a fruit (vegetable) if the flower has been successful in becoming fertilized. Now that we can recognize a female flower, let’s look at a male blossom.
In the photo above, you can see the stem under the blossom is straight and “normal” looking with no bulging. This allows one to easily identify male and female flowers across many varieties of vegetable plants.
Above is a photo of the male flower after it has been picked. You can see that the base of this male flower does not have the swelling that the female flower had.
Above, you can see the inside of the male flower with the petals peeled away from the front of the flower. The anther and filament of the stamen is visible. The anther is what we will use for pollination of the female flower. Now we want to go ahead and peel off all the petals to fully expose the anther.
Now the male flower (the anther) is fully exposed and ready to fertilize the female flower. Now we go back to the female flower and gently open the petals if they are not already open.
As you can see, the anther of the male flower is being gently placed inside the female flower and the pollen is transferring from the anther to the stigma of the female’s pistil (female parts). I just rub the flowers gently together to transfer the pollen. While I have the male flower available, I check for any other female flowers that need pollination. Finding none, I’m finished with pollinating for today and I’ll check again in a few days. When in doubt about which blossoms have been done, I’ll repeat this process in a few days to make sure that I haven’t missed any. There are typically lots more male flowers than female flowers so I am not worried about running out from picking them.
Above is a baby squash. This used to be a female flower, and you can still see the brown wilted petals on the top tip of the squash in the upper left of the photo. Soon this will be fully grown squash ready for harvest. This same method can be used to manually pollinate other vegetables such as pumpkins and zucchini.
Grow Potatoes in an Expandable Potato Box
This is my first year growing potatoes, but I have read a lot about growing potatoes in various structures like a trash can or in stacked used tires. I decided to try an idea I saw on the internet about potato boxes.
Potatoes are a tuber, not a root, so the potatoes grow around the base of the plant. If you continue to stack soil around the growing plant, the plant will get taller and more potatoes will grow in the added soil and result in a greater yield.
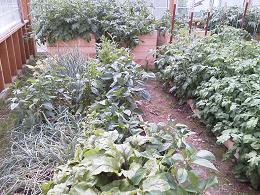
I am growing my garden in a greenhouse addition to my home. Once I picked the spot where I wanted my potatoes, I set to work building the boxes from 2×6 and 2×2 boards. The plans I was working from indicated a box 2 feet wide by 2 feet long. I decided to go with 3×3′ boxes so that I could grow more plants in that space. You can use just about any scrap boards that you may have to build these boxes. That can mean free!
First, I created a base frame using screws so they could be easily removed later. Then I placed 2×2 boards vertically and screwed them into place to help keep the future layers straight and give me something to fasten those rows of boards onto. Now it is time to find its permanent place. I prefer to use a weed barrier cloth under my raised boxes to keep the plants from rooting into the ground below and to keep any grass or weeds from growing up into my plants. Then soil can be placed into the box and watered periodocally to ensure a consistent moisture in the soil.
I placed another layer of 2×6 boards above the first as they will not be so high as to block the sunlight but will be convenient for the next time I need to add soil. For this first day, I brought the soil level up to the top of the first layer of boards, about six inches. Then once it is watered adequately, it is time to place the seed potatoes on top of the soil in the places where I will want them planted. This visual aid is helpful to ensure the plants are evenly spaced.
Then with one hand, I pick up a potato. With the other hand, I move the soil aside where the potato had been and place the seed potato about 4 inches down with the “eyes” facing up if possible. Then I cover the hole and the potato is hidden completely. It is very important to make sure that potatoes are not exposed to sunlight while they grow. They will become green and a toxin is formed which is poisonous. Never eat a green potato! In the photo above, you can see the furthest box is already complete and the box in the foreground is prepared for planting with the seed potatoes on top of the soil before they’re buried. I planted these on March 10th, 2012 in a greenhouse and watered daily.
Wow, look at the growth in just six weeks! The last photo above was taken on April 26th, 2012, just about six weeks after the seed potatoes were planted. As the potato plants emerged from the soil and began to grow, I made sure they had adequate water and when they got about 12 inches high, I placed another board layer and filled the previously placed one with soil being careful not to damage the growing plants. Every time I added soil as the plants got taller, I was amazed how sparse the plants looked after new soil was added. but they quickly fluffed right back out in a few days. As you can see, I have now six layers of boards filled with soil and the plants are still growing. I don’t think I will be adding any more layers.
It is important to pinch off any emerging blossoms or flower buds on your potato plants. If a potato plant is allowed to flower, I have heard the potatoes will stop growing. It is time to harvest when the potato plants have turned brown and died. It’s time to prepare for whatever method of preservation you are choosing to use when you notice the plants are starting to turn brown. Canning is an excellent option as in storage in a cool, dark place such as a root cellar.
I will update this page when it is time to harvest my potatoes and share photos of the bounty. Please send me your photos and methods of growing potatoes! I love to learn new things and share information. If you have any questions, just email me at remembersimplicity@yahoo.com.
Seed Starting – Make your own seed-starting trays out of eggshells
If you are careful cracking them to only open the tip end, you can save the eggshells from your daily cooking for use in seed starting. Make sure to rinse them! Just set them aside until you have enough to start enough seeds for your early spring planting.
As you can see, they can add up quickly. Why throw them away when they can serve a valuable purpose? Seed starting trays can add up, but these egg shells would have just been trash or compost. While you’re gathering enough, find and save some items that will be helpful for holding your little seed starters. I have used empty foam egg cartons and also a mini-muffin pan. Keep an eye out for these mini-muffin pans at the dollar store too.
Before filling with dirt, use a pointed object like a barbeque skewer to pierce a hole in the bottom of the shell from the inside. This allows drainage. Be gentle, as this will weaken the shell quite a bit.
Fill your eggshells with good soil, either a starter mix or potting soil; just whatever you have available should work fairly well for this purpose. The kids love to help with this part.
Plant your seeds according to the package directions. Water them well, but gently, to completely saturate the soil inside the egg. You don’t want to leave standing water in there, but you want the soil good and wet. LABEL YOUR SHELLS! You don’t want to forget which shells contain which type of seeds. This is easily accomplished with a permanent marker on the outside of the shell.
Place your shells in a warm place for germination. A sunny window is a good spot so the seedlings get good light as soon as they emerge from the soil. Soon you’ll have little baby seedlings popping up and eager to enter your new garden when its time.
When it is time to transplant the seedlings, I prefer to gently crack the shell, by squeezing, so the roots can escape more easily. Then I plant the entire seedling and broken egg shell together to help add extra nutrients for plant growth.
Saving Eggs
Saving eggs – Hens do not produce many eggs during the colder months.
During my first year raising chickens, I did not know that hens virtually stop laying over the winter. This means the availability of fresh eggs is almost non-existent. During the summer and into fall, I have more eggs than I know what to do with. With this feast or famine situation with egg supply, I recommend taking surplus eggs and prepare them to be frozen. Frozen, raw, scrambled eggs will let you have eggs available during the winter months, especially for cooking in recipes. This sure beats buying eggs at the grocery store!
It is best to crack your eggs, one at a time into a separate bowl, if you are using farm fresh eggs so that you can catch “undesireables” before they are added to the rest of the cracked eggs. All you have to do is beat the eggs very well, and add about 1 teaspoon of salt per about 1 cup of beaten egg. If you’re using regular ice trays, you will want to lightly spray the ice tray with cooking oil before adding the egg. If you skip the oiling step, it will be almost impossible to remove the frozen egg from the tray. If you don’t want to rely on having an aerosol cooking spray available, you can purchase an inexpensive oil mister that will pressure and spray your desired oil. If you want to avoid using oil, you can obtain silicone ice cube trays which will allow you to pop out your frozen eggs with much more ease.
MESS ALERT: Remember that these silicone trays are flexible, so make sure to place the trays on a flat, hard surface before filling them and moving them into the freezer. A big mess can be made with unfrozen egg. A small cookie sheet or cutting board will serve this purpose. You may want to use a flat surface even with standard trays to avoid extra sloshing when transferring to the freezer.
Equivalencies and Storage: One standard size ice cube of egg equals about one medium size egg and two cubes are equivalent to about one large to extra-large egg. You can store these frozen egg cubes in sealable plastic bags for about six months. That’s plenty of time to let your hens get back to laying. Make sure to date your bags so that you can rotate your supply and stay aware of freshness.

